If you gave me face and read Build your ultimate blog with React, S3, CloudFront and Route53, then you know how badass this website is already. But young man, we’re not done yet, because as a developer, we want to

So in this article I’m gonna talk about how I provisioned CICD pipeline to build and deploy this website.
What automation are we talking about? It’s quite straightforward:
- I pushed the source files, including all the articles to a Git service, such as GitHub.
- I built an AWS CodeBuild project which takes in the source files of this website, builds it, and sync the built files to the S3 bucket hosting the website.
- I built an AWS CodePipeline which automatically pulls the source files from Git and passes them down to CodeBuild project, which does the build and deployment.
And that’s it - simply 3 steps!
Host source files
I chose to host my source in AWS CodeCommit. “Why not GitHub?”, you’re asking. I guess for one, I’m too shy to share my terrible source code to everyone. Also, CodeCommit is seamlessly integrated with AWS CodePipeline, that is one of the main services I use for this CICD. See? They really know how to make you stick to AWS.
So I logged in AWS console, went to CodeCommit service page and created a repository called blog. Following the instructions, I also set up my CodeCommit Credentials.
With some basic AWS and Git knowledge, I got my source files checked in very quickly.
Build CodeBuild
Instead of provisioning and hosting your own build server, you can set up a CodeBuild project, which can be seen as a serverless (another fancy buzz word eh?) build machine that is provisioned by AWS on the fly when your build starts. This “serverless build machine” will execute build commands in buildspec.yml file, which should be put under the project root folder.
For example, this is my buildspec.yml file.
version: 0.1

phases:
  build:
    commands:
      - echo "Starting build `date` in `pwd`"
      - npm install
      - npm run aws-build
  post_build:
    commands:
      - echo "build completed on `date`"
I did two things in this file:
- I run
npm installto install all the dependencies. - I run
npm run aws-buildto make a build and sync the built files to S3.
Let me show you the magic of aws-build in package.json:
{
  "scripts": {
    "sync-s3": "aws s3 sync public/. s3://my.blog --storage-class REDUCED_REDUNDANCY --delete",
    "aws-build": "npm run build && npm run sync-s3",
  }
}
In aws-build I first call npm run build to build the whole website and then I run sync-s3 to synchronise all the files under public/ directory to S3 bucket my.blog.
I didn’t go to CodeBuild service page because smart developers automate everything. I’m just going to pretend I’m smart here. Here’s the CloudFormation template to automate the provisioning.
ArtifactBucket:
  Type: "AWS::S3::Bucket"

CodeBuildServiceRole:
  Type: "AWS::IAM::Role"
  Properties:
    Path: "/"
    AssumeRolePolicyDocument:
      Statement:
        - Effect: Allow
          Principal:
            Service:
              - codebuild.amazonaws.com
          Action:
            - sts:AssumeRole
    ManagedPolicyArns:
      - arn:aws:iam::aws:policy/AWSCodeCommitFullAccess
    Policies:
      - PolicyName: CodeBuildAccess
        PolicyDocument:
          Statement:
            - Resource: "*"
              Effect: Allow
              Action: logs:*
            - Resource: !Sub arn:aws:s3:::${ArtifactBucket}/*
              Effect: Allow
              Action:
                - s3:GetObject
                - s3:PutObject
                - s3:GetObjectVersion
            - Resource: "*"
              Effect: Allow
              Action: s3:List*
            - Resource: arn:aws:s3:::ktei2008.blog/*
              Effect: Allow
              Action:
                - s3:GetObject
                - s3:PutObject
                - s3:DeleteObject*

CodeBuildProject:
  Type: "AWS::CodeBuild::Project"
  Properties:
    Name: BlogBuildAndDeploy
    Artifacts:
      Type: S3
      Location: !Ref ArtifactBucket
    Source:
      Type: CODECOMMIT
      Location: https://git-codecommit.ap-southeast-2.amazonaws.com/v1/repos/blog
    Environment:
      ComputeType: BUILD_GENERAL1_SMALL
      Image: aws/codebuild/nodejs:7.0.0
      Type: LINUX_CONTAINER
    ServiceRole: !Ref CodeBuildServiceRole
A few things to notice here about CodeBuild:
- It needs certain permissions to synchronise built files to the blog bucket.
- I set its Environment->Image to be
aws/codebuild/nodejs:7.0.0because Gatsby is a framework running on Node. There’re many images you can choose from. You can even provision your own image. - ComputeType is set to BUILDGENERAL1SMALL because I’m a cheapskate. If you think the build is too slow, upgrade this to BUILDGENERAL1LARGE and it’s usually much faster.
Build CodePipeline
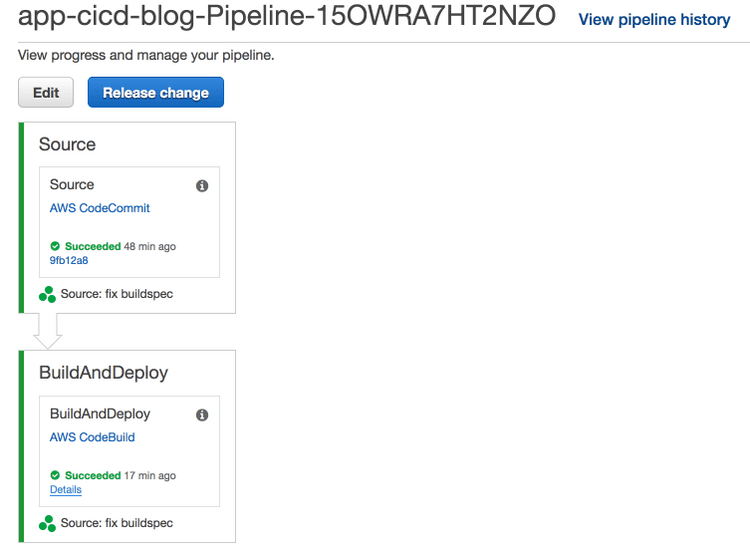
I’ve got all the pieces ready so it’s time to connect the dots. CodePipeline is perfect for this. I can create a CodePipeline and have 2 stages, the first of which is triggered whenever I push changes to CodeCommit repository. The first stage will clone the repository and put it in an artifacts S3 bucket, waiting for the CodeBuild in stage 2 to pick the source up.
In stage 2 I use CodeBuild to run gatsby build and synchronise built files to the blog bucket.
The final pipeline I created looks like this:

And this is the CloudFormation template I used to create the pipeline.
CodePipelineServiceRole:
  Type: "AWS::IAM::Role"
  Properties:
    Path: "/"
    AssumeRolePolicyDocument:
      Statement:
        - Effect: Allow
          Principal:
            Service:
              - codepipeline.amazonaws.com
          Action:
            - sts:AssumeRole
    ManagedPolicyArns:
      - arn:aws:iam::aws:policy/AWSCodeCommitFullAccess
    Policies:
      - PolicyName: CodePipelineAccess
        PolicyDocument:
          Statement:
            - Resource: "*"
              Effect: Allow
              Action:
                - iam:PassRole
            - Resource: !GetAtt CodeBuildProject.Arn
              Effect: Allow
              Action:
                - codebuild:StartBuild
                - codebuild:BatchGetBuilds
            - Resource: !Sub arn:aws:s3:::${ArtifactBucket}/*
              Effect: Allow
              Action:
                - s3:*

Pipeline:
  Type: "AWS::CodePipeline::Pipeline"
  Properties:
    RoleArn: !GetAtt CodePipelineServiceRole.Arn
    ArtifactStore:
      Type: S3
      Location: !Ref ArtifactBucket
    Stages:
      - Name: Source
        Actions:
          - Name: Source
            ActionTypeId:
              Category: Source
              Owner: AWS
              Version: 1
              Provider: CodeCommit
            Configuration:
              RepositoryName: blog
              BranchName: master
            OutputArtifacts:
              - Name: Source

      - Name: BuildAndDeploy
        Actions:
          - Name: BuildAndDeploy
            ActionTypeId:
              Category: Build
              Owner: AWS
              Version: 1
              Provider: CodeBuild
            Configuration:
              ProjectName: !Ref CodeBuildProject
            InputArtifacts:
              - Name: Source
Now I’ve built a simple CICD pipeline for my own website. This frees me up as I don’t need to worry about deployment anymore, while I can focus on wrting more bad or worse articles to mislead help you - disaster dev eh?
Conclusion
With the help of AWS CodeCommit, CodeBuild and CodePipeline, I managed to create a smooth CICD experience for my own website and it costs me little. We all want to be smart devs, and smart devs are usually lazy bastards - because they’ve automated everything for themselves! Don’t you wanna be one of them?